Sunday, November 28, 2010

Kitchen Makeover

This kitchen has been a long work of progress.  The cabinets were a cheap construction grade. The house was only built in the early 90's, they were in horrible condition.  We started by removing all the doors and doing A LOT of sanding. They were in such fragile shape, we had to be very careful.  I saw this door at Lowe's and it was my inspiration. I loved the rope detail.

Cabinet doors before and after
We glued and nailed a rope molding over the groove that was routed in the doors.
After all the doors were complete, we added a crown molding and lightrail to the bottom of the cabinets.
We sprayed the doors and cabinets with a white laquer paint.  After they were dry, we used a brown tinted glaze to go over the cabinets and doors.  The glaze was wiped off with a clean cloth, causing it to stay in the detail of the rope and grain.  It goes great with the cabinets because they are kind of knicked up. 
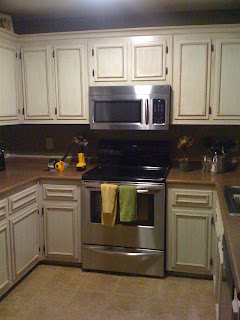
After the painting was complete, the doors were put back on and the countertop was replaced.

We chose a Formica countertop with a bullnose edge and a mosaic multicolored tile backsplash from Florum Tile Outlet.  The hardware is from Lowe's and is a oil rubbed bronze rope pull. 


Finished Product 

We love our new kitchen even though it took about a month to finish, but hey I didn't have to cook for a whole month. HA HA..  Now I actually enjoy cooking in my kitchen because it is so pretty and I can enjoy all the hard work we put into it.

Sunday, November 21, 2010

Christmas Tree Topper

I have always loved a themed tree and for the past couple of years have been collecting only silver and red ornaments and decor for my tree.  This year my aunt gave us her old tree, and I was so very happy to put it up.  After we put it up I came to realize, it is MASSIVE and overwhelms our living room.  I sat there debating on how I have complained about our "tiny" Christmas tree for a couple of years, and now I have this huge tree.  I decided to just deal with it.  It was so large, I couldn't even the angel on top of the tree, because she was hitting the ceiling.  Luckily over the years I have "collected" various beaded sticks that go randomly in my tree. I like to call them fireworks.  I cannot remember where I purchased them, but I'm pretty sure I got them at Hobby Lobby.  I started by putting the large white ones around the top trying to cover up the very top of the tree.  I used the colored ones only in the front, below the white ones.  And the red ones above camoflaging the top of the tree.  Check it out!
White Fireworks

Silver & Red Fireworks


Firework Topper

Merry Christmas Everyone!

Stamped Tin

I just recently got a new bedroom suite, and have been waiting to save money to buy something to go over my new bed.  I came across these some stamped tins at Pottery Barn that hang on the wall that would have gone perfectly, but the prize was really high. ($99, Like most things at this store are WAY overpriced) I was not going to even think about paying that much for them.  I knew I had seen some similar ones at Hobby Lobby before so I figured I could just revamp my own.  I purchased three brown stamped tins and a can of off white spray paint.  They did not have three tins that were all the same design, so I bought a different one for the middle. It was so simple. I just sprayed them lightly to give more of an antique look.  After they had dried, I took a sanding block and lightly went over them.  Here is some step by step pictures of the process.

Before painted

After a light coat


After sanded


Finished product


Pottery Barn's for $99
 I wanted something really simple and small, because the headboard is so tall.  I purchased these three stamped tins at Hobby Lobby for $8 a piece. They were orginally $15.99, but they were 1/2 off.  Altogether my total purchase with the spray paint was $30.  Take that Pottery Barn!

Inspiration

I get alot of inspiration from looking online at articles and blogs.  I just really enjoy transforming something old into something new.  The treasures one can find in their own home is unbelievable.  One ends up spending a lot less money and can really appreciate their work.  I am also a graduate of interior design school, but did not get to chase my dreams due to the bad economy.  A couple of years ago, my husband and I started giving our house a major makeover.  It was a rental house before and was just not taken care of like it should have been.  When we first started I have no idea what I was doing, I knew what I wanted, but did not know how to get there. Now two years later, we have redone every room in our house.  I am still slowly putting the decorating part together, but hey when you are on a budget, it takes a while!  While my husband helps with the major renovations, I'm usually just the "brains" of the project. Now I'd have to say I'm pretty handy and can do a lot more DIY projects around the house than before, without the help of someone. Here are a few random blogs I look at to get inspiration and ideas. 

http://thegoodlifebyerin.blogspot.com/
http://shanty2chic.blogspot.com/

Thursday, November 18, 2010

Bathroom Remodel B

As I posted previously for the master bathroom remodel, everything was removed and replaced in the bathroom.  This will focus more on the vanity itself and accessories.  This is more of a renovation rather than a DIY project, but I still wanted to share!  The existing vanity was a construction grade, plain vanity with two very small drawers, that was just not big enough for two people. We had  a family friend build it and we helped to paint and glaze it. We replaced our vanity with a solid wood vanity. It is painted white with a dark brown glaze complete with rope brushed nickel hardware.  The top I selected is a Giallo Oranamental Granite with a off white under mount bowl and a faucet to match the hardware. The wall color coordinates with the connected master bedroom. I had a hard time finding a color that matched, so I took my pillow to Lowe's and they matched the color perfectly.  The mirror was a perfect find, along with the picture on the wall, that I stumbled upon at Hobby Lobby for half price.  The flower arrangement is something I threw together one day, along with the cute canisters on the counter.  I love how this room turned out as well!!


Monday, November 15, 2010

Chairs

After the China Cabinet was complete, I ended up having some material left over.  I decided it would be nice to recover the seats on my bar stools in the same room.  It ties everything together and I never really liked the black material on the stools.  The chairs are from Sticks N Stuff, a furniture store located in Clarksville.  It has good prices, but the quality is not so great.  I started by unscrewing the seats from the stool.  There was only about three screws holding them together.  I cut the material about 4 " bigger than the seats, leaving plenty of room to be wrapped around to cover the whole seat. Before I began stapling the material, I added  wood glue to the bottom just for extra support, in case the material would tear around the staples.  Then I  stapled the material to the bottom part of the seat, but checking the corners to make sure I liked how it was folded.  After the glue dried for a couple hours, I screwed the seats back to the stools.  I was worried about the material being so thin, so I also added more glue under the stool, where the seat and stool meet in corners.  I was amazed at how well the whole room is tied together now. Here are some before and after pictures of the bar stools.

Before Bar 

After Bar

Before Table

After Table


Tuesday, November 9, 2010

China Cabinet Cont.

Materials
2  54" x 84" drapes from Target $50.00

Supplies:
Staple Gun with staples
Gorilla Glue

I began this project a few weeks ago, but yesterday I  went on the search for fabric to reupholster my bar stooling and finish up the backing to my china cabinet.  After searching at Hancock Fabrics, I did not see anything that I was just crazy about and it was rather expensive.  I proceeded to look for a shower curtain or some type of window treatment.  I found a really cute drape at my favorite store, Target.  The price was a little more than I wanted to spend, but I really liked it. 

After I removed the panel from the back of the china cabinet, I glued the fabric on the backside, by wrapping it around the panel. If you have never used Gorilla Glue, let me tell you, use sparingly because it expands!  I did not use the staples because I was worried the staples would puncture the panel.  After the glue was dry I stapled the panel back to the china cabinet.  It really turned out to be such an each job!

Close up!

Side View!

Once again I LOVE how this turned out.  It adds a little something extra to it.

Thursday, November 4, 2010

Bathroom Remodel A

For this remodel project, I will start with the shower.  This master bathroom, that was once not so master is fabulous now, but it was definetly needed some attention. I will not be breaking this project down by materials and supplies because it is such a big project. 

Before this shower was a tall fiberglass shower/tub like in most houses.  I decided I wanted to add tile and a little something special to it.  After the new drywall was complete and a new tub was installed the tile work began. We picked out a 6" neutral color ceramic tile with the matching bullnose, stairnose, and beck pieces for the design I was wanted to achieve.  The glass brown tile came in 12"x12" pieces and was cut down to 3" for the focal point. I chose diagonal for the bottom half of the tub with a brick layered look at the top.  I also added a 12"x18" cut in the drywall for shampoo and toiletries.  After all the tile was layed, the grout was applied and wiped off until clean.  For the faucets I went with a brushed nickel Delta faucet because of their lifetime parts warranty. 


I am very please with how this project turned out.  I do not have any before pictures, but as I described earlier, it was very plain. 


Headboard

Materials Needed:

4x8 5/8" Plywood    $18.75
3 Yards of Fabric    $12.00
Trim Uphostery       $20.00
Queen size Eggshell $20.00


Supplies Needed:

Staples & Staple Gun
Hammer
Jig Saw
Cardboard

I wanted this homemade headboard to look different than the regular tall square with the buttons. This headboard is for a queen size bed, so we made it around 60" x 48".  The template for the angle at the top was made with a cardboard cut out. I pretty much eyeballed the angle and used it for both sides.  After the wood was cute into the shape we wanted, we then covered it with the eggshell foam for a thicker appearance.  We  layed the material across the foam covered board. It is very important to iron your fabric before placing the fabric.  The upholstery trim was in a roll, which is definetly worth the extra money.  You just nail about every ten nails into the board.  I made sure the trim was about three inches from the sides and for the top horizonal, we did about five inches.  After the trim was nailed down, staple the fabric to the back of the headboard.  It is easier to check your work before nailing it down to prevent wrinkles. 
Finished Product!